Thursday 20 September 2012

Back at Uni

I will be honest here. I forgot about writing. Although I haven't made many significant additions to  my project since last time, I was too busy packing last week and too busy partying this. I did get the chance to sit down and do some hard core AutoCAD yesterday. I also began my presentation sheets and even made a passable attempt at a photo montage. 


Yesterday's work also included me working out the joints for my frame and building it properly on AutoCAD. This was either very simple or my skills are improving significantly! From having my frame built, I could then go on to explode it to show how it all fitted together. 

So, like I said, I am back at uni now and had my introductory lecture this afternoon. We have been given the new brief: to design and (some of us) built a pavilion for Dunham Massey.  We are heading out there next Tuesday to see the house and make some site analysis etc. 


Frame with posts that will eventually support the walls
and the roof.
Plan of the frame showing the holes where the posts sit.


Probably the best bit of news we received today was that, for the time being at least, we don't have to get the A1 poster and film together to present. We simply have to put the work we have done onto a sheet and bring it with us on Tuesday to show to the rest of our group, to give them an idea of our skills etc, as we will be working in groups for this project. Sweet!

Sunday 9 September 2012

Up to Date

Ok, I realise its a bit late but I felt it was about time I blogged due to the slight change in design plan. It's kinda cheating, but I tried to create my design on AutoCAD and SketchUp. And I couldn't. Maybe later on I will be able to but for now I can't. And I did try. Promise.

So I went back to the cardboard wedges and had another play around with them. This time, instead of trying to make a 3D shape with them, I tried looking at them as if they were a plan and I came up with a simpler but I think even more effective design.

I was able to stick to my idea of a narrow space opening onto the landscape and making the most of the view, which I am really please with although I had to make a couple of alterations to it.
These aren't the best models in the world and they do need and will be having a lot of work done to them but I hope it gives a bit of an idea.
I created the design by laying out the wedges in a semicircular shape but fanning out to break up a perfect curve. The rest of the design, such as the walls and the doorway (although like I said, some adjustment was needed) just fell into place. Even AutoCAD was useful in that it actually showed me how I was going to build it, if I get to build it. The frame, columns, walls and then roof. There a no windows, so it is all open to the elements but thinking about it, and looking at it now, I might alter the roof slightly by making it overhang a bit, to provide a bit of extra shelter. But that is something for later.

Along with packing, I plan on getting my video well and truly nailed tomorrow. I know what I want to do but I know how long it is going to take so it could be an all day job. But if I get it right, it should look amazing!

After that, what is left to do is the presentation sheet, for when I find the right software, and produce the drawings etc showing the structure and how the shelter is assembled.

After chatting to one of my studiomates from last year, I am eager to get on with this again, as despite (nearly) finishing off my computer models, I've hardly touched it this weekend. Which isn't good.


Tuesday 4 September 2012

Getting there . . . .


Ok, so after looking at some precedents and, well, doodling really, I think I have come up with my design.

I should probably start at the beginning (she says reaching for her sketchbook). I decided the most important thing my design should focus on is the view from it. So I began making some little sketches - and even did a parti diagram!
This moved me onto a circular design, thinking observation towers and 360 view etc.
Then I cut up the circle and starting thinking wedge shapes, starting narrow and opening up to the view at the end.
As I was sketching, I suddenly thought back to the map I had drawn of Lake Windermere and the OS symbol for a viewpoint and went from there. I looked again at one of my precedents, a ferry shelter in Scotland.


The idea behind this three-pieced shelter is to direct the users view to different areas surrounding it. The long white corridor has high walls, causing the viewer to look up at the sky. The black tunnel has an open slat floor and lower wall, allowing the user to look down at the rocky dike beneath it. At the very end of the walkway is a glass box where the view is out across the sea and along the island, as well as up to the sky, creating a full panoramic scene.
This reminded me of something that I had recently read in one of my books:

'Our experience of an architectural space is strongly
influenced by how we arrive in it'

Basically, an expansive view, for example, will look even bigger after approaching it through a narrow and small space. I decided to try and use this theory in my own design.

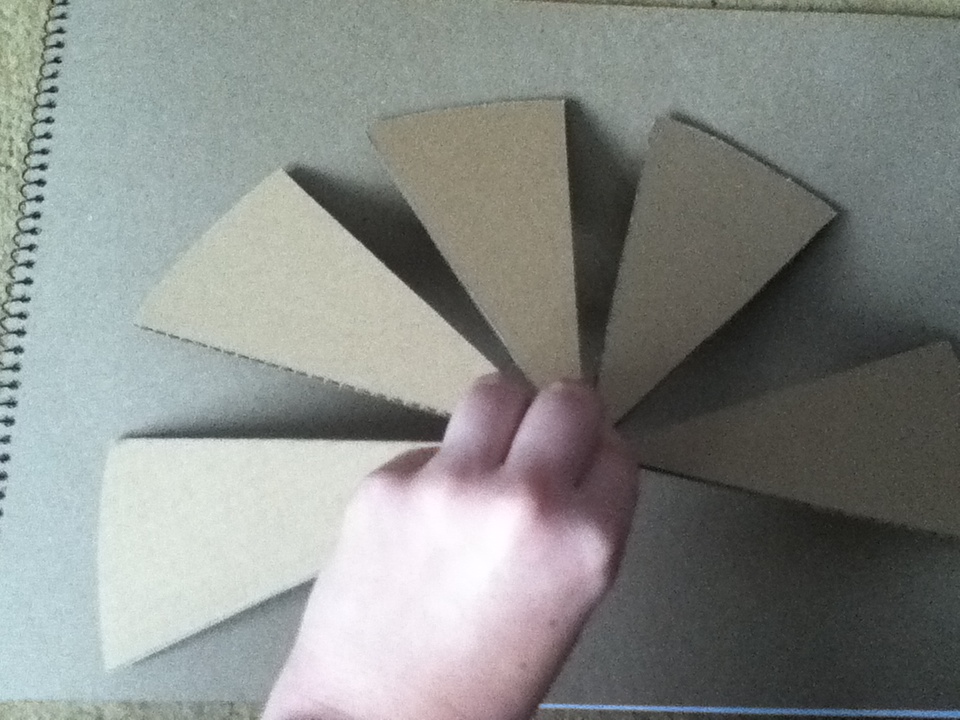
So, back to the view point symbol, I cut out a number of wedge shapes from cardboard and had a play around with them, trying different shapes.


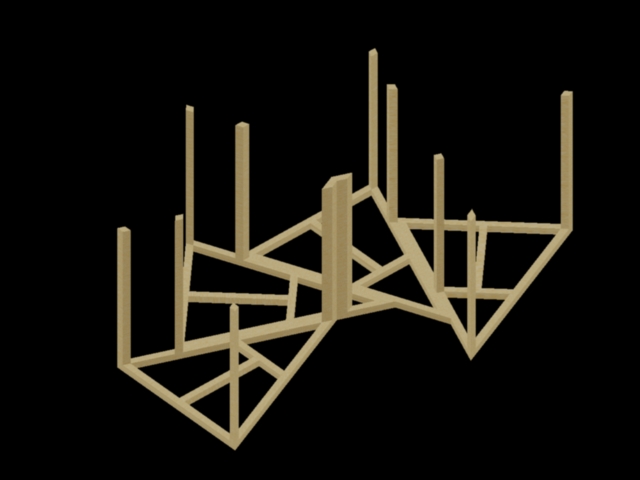
This was one of my first ideas, one a particularly liked and after making a sketch or three, I moved away from it to try some other designs. After a while, I felt I had exhausted most combinations but realise that I was assuming the wedges were flat and solid. Of course I couldn't model a curved surface with card so I went back to my paper template and came up with this design.

 (rubber not to scale or featuring in final model!)
Instead of having five wedges joint at the top and openings between them, creating a fairly open 'shelter', I used seven, one of which, the centre wedge, curling underneath in order to create a opening whilst keeping the view fairly hidden from those outside.
I realise that it would either be a very high apex or a very low entrance but I still need to work that bit out and scale it properly.

I also have to keep in mind that it is to be assembled by no more than five people and I have to somehow put it onto AutoCAD! But I'll work that one out when I get there!